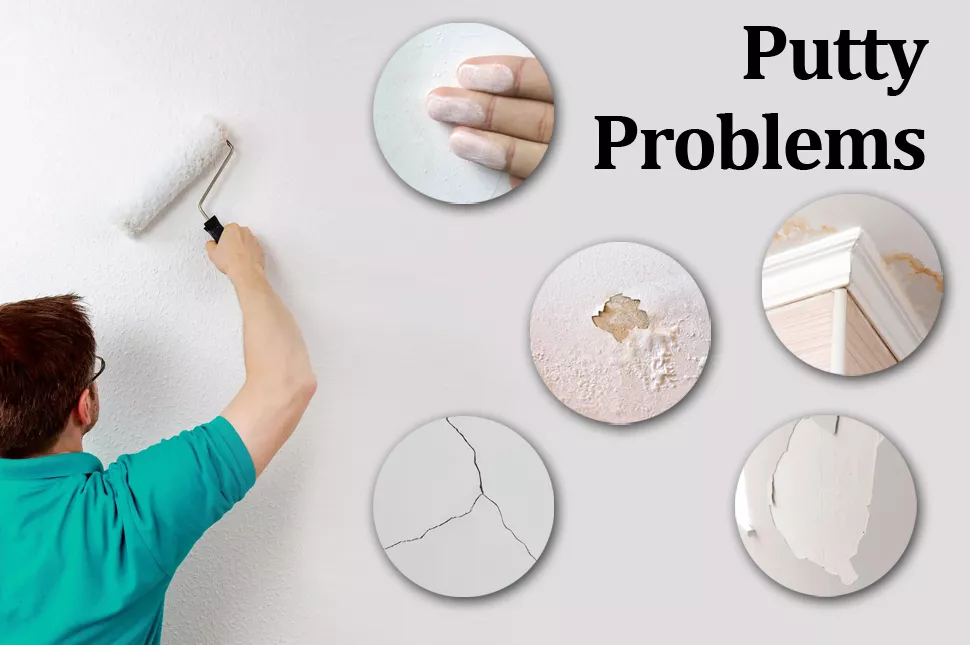
Popular Wall Putty Issues and Repair.
Issues with putty on walls are not common concerning the product. They nearly always concern what preceded the application almost always or during the application. This guide identifies the most frequent problems that builders, contractors, and homeowners encounter, clarifies why they happen in the first place, and provides you with a straightforward, practical advice that will help to resolve them and ensure their recurrence.
It is very depressing to complete a wall, stand back to look at what you have done and see cracks developing at the drying places of the putty, or to see the paint peel a few months later off a wall that you handed over. Those issues are irritating since they appear to be misplaced. But they rarely do.
Over the years, we have talked to a sufficient number of applicators and homeowners at Shashwat Wallcare to appreciate that at any given time, there are a few issues that are raised repeatedly. And in virtually all situations, there is a distinct cause of either one of them – and a distinct way out of it. We will begin with each of them.
01 Problem
How To Crack Putty When It Is Dried.
You roll the putty and flatten it and it looks just fine when it is wet. Then when it dries there come the small cracks in the hairlines, or at the worst still, more serious cracks running across. It is not only among the most frequent complaints, but also the most preventable ones.
Why It Happens
The primary guilt is the thickness of the coat. Putty also contracts to some extent as it dries out and in cases where the coat is too thick the contraction produces internal tension not manageable by the surface, it cracks. The same is true of a mix which is too stiff and which contains too little water. It is further aggravated by the fact that working in direct sun light or hot and dry makes it hard to work due to the hardening of the outer surface before the interior has even solidified and the varying process of drying leaves the work split.
How to Fix It
For fine surface cracks
Fill up the fissure with sand and rub off all the dust, then put on a new coat of putty, of a thin layer, properly mixed. Keep the wall stained in process of drying.
For deep cracks
Clean the ruined part out to the last. Filler of cracks Apply a coat of putty no more than 1 to 1.5 mm thick, allow to dry, and apply a second coat of putty.
Going forward
Attempt not to build thickness with one coat. With two or three thin coats with due drying between will always do better than one thick coat.
02 Problem
Not Sticking to the Wall or Putty Demolition.
Sides rising, parts sliding away or peeling off in patches months after workmanship – are all indications that the putty did not fuse well to the surface beneath. The paint appears to be good, and then the failure makes its presence felt at the most inappropriate time.
Why It Happens
Weak adhesion is nearly always a failure on surface preparation. The putty does not get in contact with the plaster at all because of dust, old loose paint, grease or chalky residue on the wall. Another common cause is new plaster that has not fully dried and therefore, the plaster is still expelling moisture, which disrupts the bond. Another reason that walls may reject putty is by being too smooth and non-porous, without any bonding treatment having been applied in advance.
How to Fix It
Eliminate failing putty altogether.
Peel everything that has lost adhesion off with a scraper. The stuff applied on top of loose putty is only delaying the issue.
Clean the surface completely.
Before proceeding to do anything, brush all the dust off, cleanse away all greasy spots, and ensure that the plaster behind is hard and well fused.
Prime or use a bonding agent
On extremely smooth or already painted surfaces put down an appropriate primer and leave it to dry in full before re-applying putty.
On new plaster
Before putting on about 28 days of the plaster to dry, always wait before application of putty.
03 Problem
Lumpy, ragged, or spotty Surface Post- Drying.
The putty is dry, but the surface seems irregular–there are trowel marks on it, some of the areas are smooth and others are rough, and you can see at a glance that this wall is never going to be presentable under paint. Every flaw is emphasized even further in raking light.
Why It Happens
It is near always an issue of application techniques. Rushing, not applying a trowel closely enough, or using a mixture that is too dry, so that it drags, rather than sliding, will make the surface uneasy and rough. Omission of sanding between coats is the other probable cause. Each coat of putty has certain surface marks of the trowel. Those marks are stuck in and increased with each coating of sand on them without sanding.
How to Fix It
Sand with 180-grit once fully dry
Not a blow through it, but concentrate on the lines of the ridges and the raised trowel lines. Apply steady round pressure and apply it uniformly over the whole area.
Clean before every coat
Flick off all dust when sanding with dry cloth then place the next coat on before sanding again sanding recreates the texture you have just sanded off.
Use a wider trowel
The load on a trowel of 10 to 12 inches is more uniform, and streaking is minimized than with a thin blade.
Finish with 240-grit
Apply a final coating with sandpaper, though, fine in grit, and you will have a really smooth, paint-ready surface when you prime.
04 Problem
Extrusion of Putty too Rapidly, and getting too hard.
You pour another batch of it, begin to apply it and before one and a quarter hours have passed, the putty in the bucket is already beginning to dry. You pour a little water in and stir it back but the consistency is not right and the application is messy and uneven. The clock is beating you.
Why It Happens
The powdered cement that is made of white cement initiates the chemical setting of the putty as soon as water is added. The working window is normally between 30 and 45 minutes, and during hot weather or a dry environment that is reduced significantly. Excessively large batches mixed at once imply that the second half of the mix will be continuously settling whilst you are still doing the first half. Set time may also be made unpredictably shorter using warm water or water that has been exposed to direct sunlight.
How to Fix It
Only combine what you can exhaust within 30 minutes.
Two small batches are always more effective than having one large batch which will solidify too soon.
Use cool, clean water
It should not be put in containers which were in the sun. Cool water further provides you with a better and longer working time.
Never re-temper set putty
When the setting has commenced, the water addition and remixing of the setting alters the chemical structure. Waste it and begin a new lot- the stuff will not work right when remodeled.
Plan your timing
During the summer seasons, you can work in the cool mornings or the late evenings to automatically increase your working time.
05 Problem
Wet or Soggy Stains Leaking through the Putty.
Darkness, yellowish affected areas or dampness is manifested in the putty and later on the paint. However many coats are put on top, the staining continues to reoccur. This is among the most tenacious problems due to the fact that the cause of it is not the putty but the activity within the wall.
Why It Happens
It is no solution to apply any type of a wall finish over a wall that is in active operation of moisture. The dampness keeps on pushing the way out, loosening the layer of putty at the back which discolours, weakening the bonds, and finally, creating bubbles and peeling paint. The cause might be the plumbing leakage behind the wall, ascending dampness at the floor level or the water penetrating through an external wall in the rainy season.
How to Fix It
Strip back the surface first
Clean up all the putty and paint in the affected area to see the plaster and find out what is occurring under this.
Identify and correct or eliminate the source of the moisture.
This step is non-negotiable. There will be no surface treatment that is permanent over active water ingress. Find the origin, be it a pipe, a roof, or rising dampness and fix it.
Allow complete drying time
This may take weeks depending on the level of saturation on the wall. Do not rush this stage.
Use a damp-proof sealer or primer.
before re-applying putty. This gives a shield against any moisture that is left behind in the wall.
Summary Problem, Cause and Solution The Simplest Solution is Prevention.
These practices will help abolish the majority of putty issues before they begin.
Allow new plaster to dry at least 28 days.
- Beforehand, remove dust and loose material.
- Bake in small portions – no more than a 30-minute window.
- Have all coats 1 -1.5 mm thick.
- Between each coating, sand of 180 grit.
- Always add cool clean water to mix.
- Do NOT use during sunny or hot days.
Make sure that the moisture is addressed before taking the trowel.
Anything Here Police Can Prevent Cause a Problem.
That is the rope tying all the five issues discussed in this guide. Problems with putting up walls are not random. They are dated back to preparation or mixing, application technique or environmental conditions, all of which you can manipulate once you know what to pay attention to.
A wall which has been duly prepared, filled with well mixed putty laid on in the correct thickness, sanded between coats, and allowed to dry thoroughly before paint– that wall never acquires these evils. The decisions made at every stage of a process are what result in the quality of the finish you will accomplish.
In Shashwat Wallcare, we have a white cement-based wall putty, which is designed to work well provided it is used properly. The formulation provides you good workability, great adhesion, and a finish which accepts paint well. However, the best product requires the right environment to work to its advantage. We are hoping that this guide can assist you in establishing those conditions – and achieve the results that your work deserves.
In case of particular situation you are not covered here, then address your nearest Shashwat Wallcare distributor. We are never hesitant in assisting you to solve a dilemma and seek the appropriate avenue.